

The last post finished with a program failing to compile because certain things weren’t installed by default.
In this post we go through setting up the local environment so that you can build and execute your program properly.
IMPORTANT NOTE/DISCLAIMER ON STEAM-OS UPDATES:
Some of this setup requires modifying a read-only part of the SteamOS… a part that will very likely get overwritten on the next SteamOS update, and then you’ll need to re-do these steps.
Don’t worry, everything from Part 1 of this series (all the ssh and password bits) persists across updates, and any non-system file modifications (e.g. things you put under user directory) will also persist across updates… but some of these packages that ARE installed by default (but in a very cut-down way), will get overwritten.
For that reason, once you’re comfortable running these steps manually it’s advised that you just pop a bash script on the deck somewhere (e.g. the desktop or someting) that does them, and after a SteamOS update you can ssh in from your PC, run it, and be back up and running super quickly.
Arch Linux and Pacman
One thing worth covering really early on here, that will help with any troubleshooting you want to do in the future, is that SteamOS on the Deck is built from Arch Linux. To verify this yourself you can use the following terminal command
- cat /proc/version

This means that, for example, instead of using “apt” for the package manager, you use “pacman”, but Arch has lots of other little quirks that you may run into in your travels!
In the post below we use some of the following pacman functionality so I’ll briefly list them here.
- You install packages with
-S, e.g. “pacman -S packagename“ - You can query the package database with
-Qs - You can query the sync database with
-Ss - You remove packages with
-R, e.g. “pacman -R packagename“
(We don’t actually use that one below, but I’m listing it here in-case you have any issues and want to remove a package and repeat install steps etc on your own).
There’s a lot more functionality in pacman of course, so check out the archlinux wiki on pacman for a greater listing:
One other related Arch-quirk that you’ll run into early on is that unlike with other distributions, Arch doesn’t tend to have separate packages for the runtime and for developement files. That is to say, there’s no “somepkg” with the runtime bits and “somepkg-dev” for the developer source, libs and debug runtime bits, it’s all in one.
- e.g. on Ubuntu there is “libgl” and “libgl-dev”, but on Arch there is only “libgl” which is both.
Quirks of Valve’s default install setup:
There will be cases where if you ask the package manager to check if something is installed, it will say it IS installed and even specify the version (e.g. glibc, or linux-api-headers which I query below).

However, some files within those packages will be missing because Valve has installed cut-down versions of certain packages, likely to cut down on OS size for the smaller storage versions of deck. Then, when you install the same package over the top from the package manager, all those missing files suddenly re-appear.
It’s easy to see why this would have happened; the development files are included in the base packages, but Valve doesn’t want to distribute those unnecessarily; they do still have to install the package as a whole for the runtime components, and so they then just crop out any files they see as unnecessary afterwards, leaving a slightly Frankensteined install.
This lead to some confusion early on where it would report that files in supposedly installed packages were missing (e.g. stdio.h or features.h as you’ll see later), but fortunately the solution is at least a straight forward one… re-install over the top 😁… it’s just something to be aware of!!
Disabling readonly protections
So the first thing we need to do, as mentioned in the disclaimer bit above, is disable the readonly protections, which you do with the following command
sudo steamos-readonly disable
Valve doesn’t advise changing this of course, primarily because the readonly bit is going to get clobbered again, but also you don’t want to leave this section writable all of the time, having it readonly is an additional level of protection.
Fortunately, we only need to disable this temporarily, once you’re done installing everything later, you can just re-enable the readonly protections by calling:
sudo steamos-readonly enable
Installing build-essentials
Unfortunately for Arch this isn’t as simple as on e.g. Ubuntu where you’d just do “apt-get install build_essentials”… there are a few more steps.
First of all, we need to initialise a key-ring and populate it with common archlinux keys
sudo pacman-key --initsudo pacman-key --populate archlinuxsudo pacman-key --populate holo
Now we can use pacman to install our base-developer bits, which will include tools needed for building (compiling and linking), so includes dependencies for gcc/g++ etc.
sudo pacman -S base-develHit enter to install all (the default)
(Note: There IS a minimal version of this, where you use “sudo pacman -S --needed base-devel” but I found that was missing things I needed, so I went with the full install and recommend you do too to avoid future pain).
If you try to compile again now it will at least recognise the compilers, but you’ll get errors like “stdio.h” missing, or “features.h” missing, linked off of some platform headers… this is due to those aforementioned cutdown packages.
For example, compiling our test.cpp file with gcc or c++ now looks like this:

(gcc/g++ are recognised now at least, but common libc files are missing!)
For good measure I made another quick hello world program that uses iostream instead and looks like this in nano (I called it test2.cpp because I’m fun and original like that 😛)

And if we try to compile this one, we see that it’s complaining that features.h is missing, another libc file.

So it should be clear that what’s installed by default has some holes in it.
To fix the holes in the c-library headers you can use the following command
sudo pacman -S glibc linux-api-headers
You should now be able to go back to that test.cpp file we made in part one and actually compile our hello world program. It will now generate our test.o output file, huzzah!

And the we can just link the output file into an executable and run it!
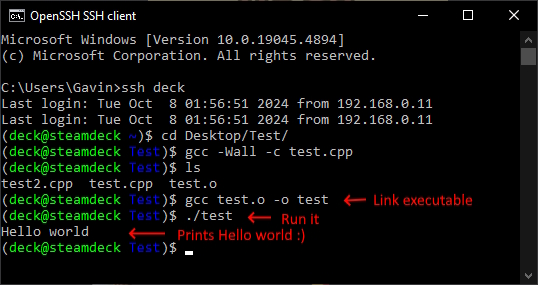
And there you have it, bare minimum build essentals to compile a hello world program directly on the Steam Deck and run it… the sky’s the limit from here! 😉
Bonus Round Installs!
Here are some other common installs that you might want to do in response to a build complaining about missing files, or might want to install pre-emptively if you know you plan to use them…
… Quick fire round!
Install glut via ‘freeglut’ on archlinux
sudo pacman -S freeglut
Missing “GL/gl.h”
sudo pacman -S libgl- (You might’ve expected libgl-dev or someting as on other distros, but remember in arch there are usually no separate -dev packages, it’s all just bundled with the main package)
Missing “glu.h”
sudo pacman -S glu
“X11/xlib.h” missing
- This one is only an issue if you want to use X11 windows directly (outside of glut etc)
- If you do “
sudo pacman -Ss libx11” it will say it’s already installed (and it is, but only runtime, not the dev setup), so re-install it. pacman -S libx11- Errors will change to “X11/X.h” missing (being included from the now-found xlib.h). To resolve those install xorgproto.
sudo pacman -S xorgproto- (This was previously xproto)
Missing “png.h”
sudo pacman -S libpng- This is one of those “already installed, but cut down to runtime, so install it anyway” ones.
- Should add a /usr/include/libpng16 folder with the files you need
Missing “asoundlib.h”
sudo pacman -S alsa-lib- Another “runtime installed, dev bits not” one on deck.
- Should add a /usr/include/alpha/asoundlib.h file
- It also puts one in /usr/include and /usr/include/sys … you do you linux! 🤣
Missing “SDL.h”
- And yes, /usr/include/sdl2/… files really don’t exist
sudo pacman -S sdl2- … and now they do exist 😁
Missing “SDL_image.h”
sudo pacman -S sdl2_image- Careful not to install sdl_image instead … that’s for SDL 1!
… I’m sure there are more, but that covers quite a lot of common ones, and certainly ones I ran into either when making little test apps (e.g. the glut bits when first doing visual program tests) or working on the emulator itself (SDL2 bits etc).
Reminder: You can re-enable the steam readonly protections now as we’re done installing. (Instructions further up)
What next?
Well at this point the steam-deck specific bits of setting up a development envionment are basically done. If you’re already familiar with using gcc and scp/sftp-ing files over you’d be able to just expand on the above to start developing full programs/apps/games.
And I’m sure you can find the pacman-specific package names for any additional libraries you might need to install etc with a bit of googling.
So we’ll call the “installing a development environment” bit done and switch gears a little bit; to remote development with an IDE.
In the next post we’ll cover how to go about using Visual Studio to remotely develop on the Steam Deck; making use of the VSLinux project support. This is my preferred development environment for making programs that run on both windows and linux and is how I did all of my emulator work (as well as my ongoing engine development).
We’ll cover the same simple hello-world style program first (but remotely developed), and then try to make a quick graphical application with glut… running into, and solving, some quirks that come up there with xauth and display export! (The fun never ends! I will say, that was particularly painful the first time around, so hopefully I can save you some troubles there!)
Until next time though, happy coding!

Leave a comment