

When we left off our last post, we were able to connect to the SteamDeck with SSH and we had set up a development environment that meant that you could compile and execute code on the SteamDeck itself.
At that point, you can pretty much choose your preferred-IDE and as long as it has a way to deploy files over SSH and invoke a commandline to compile, you can have it deploy & build files deck-side.
For me, my preferred daily development IDE is Visual Studio (not to be confused with VisualStudio Code (or “VSCode”)), and being able to have one setup that lets you build for Windows or Linux and have it deploy and run on the target machine is just a very convenient way of working.
My workflow is basically like this:
- Have a singular solution with both the windows and linux projects in.
- Write code
- Build on Windows
- Test on Windows
- … then when I’m happy it’s all working as-intended …
- Build the Linux project (which deploys to a Linux VM and compiles there)
- Test the project on Linux, launching & debugging remotely on the Linux VM (or Linux machine) via Visual Studio.
- … then assuming everything works on both platforms …
- Check in the code.
It means I can develop for two platforms simultaneously and test both natively, but from within one IDE and one codebase.
So in this post I’m going to share up the Linux-side of that workflow, which is how to make a VSLinux-project and compile and debug it remotely, from within Visual Studio… and we’re going to use our Steam Deck as the remote machine! (though swapping it to any SSH connection is super easy after the fact, so with my NES emulator I was just swapping back and forth between testing on the LinuxVM and testing on the SteamDeck itself).
Anyway… without further ado, let’s get cracking!
Adding a remote target in Visual Studio:
This is supposed to be very straight forward, and IF it “just works” for you (due to an updated SteamOS or updated Visual Studio making things smoother) then wonderful, but the first time I did this I had to wrestle with it a bit to get it to connect to a Steam Deck, so I’ll go through what to do if that happens to you too… but first, the standard procedure!
Note: I’m demonstrating this in VS2022, but the option also exists in VS2017 and VS2019, and, interestingly, the connections are put in a shared location, so if you have multiple versions of visual studio installed you’ll see the connections appear in all of them (handy when you want to upgrade to a newer version and they’re just there!).
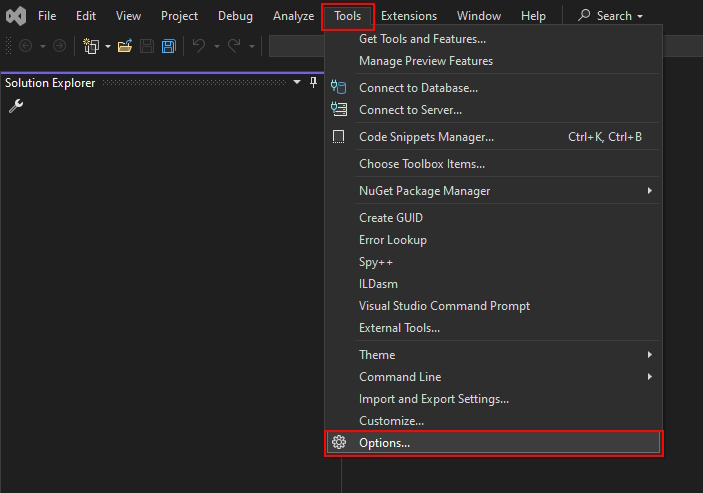
First go to Tools->Options:
Then in the Options menu find the “Cross Platform” section on the left:
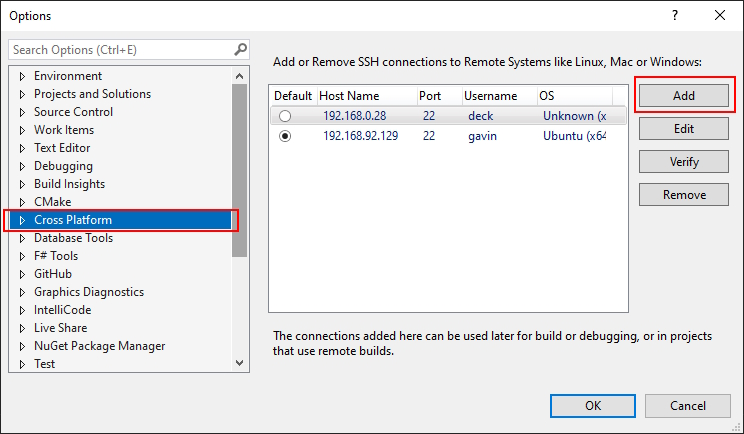
This is where all of your currently set-up connections can be found, you can see my Ubuntu VM and my Steam-Deck connections in the window above. You could use exactly this same setup to connect to anything ssh-able with a static host, e.g. a Linux box running in the cloud, if you wanted to.
Click “Add” to bring up the new-connection dialog:

The user-name and host name combined make up the standard ssh connection address, (e.g. username@hostname -> "deck@steamdeck"), though I tend to use the ip address here rather than the alias to remove discoverability as a factor.
Select the authentication type you prefer, I tend to use “Password” rather than “Private Key”, but if I was hosting something more remotely or off-network I might be inclined to use a private key for it, like the one we generated in the first post of this series.
Provide the appropriate detail and hit “Connect”.
IF this connects, you’re golden… just skip further down to the section on “Making a Visual Studio Linux project ("VSLinux")“.
You may, however, also get an error along the lines of:"Unable to negotiate with 192.168.0.28 port 22: no matching cipher found. Their offer: aes256-cbc,aes192-cbc,aes128-cbc,3des-cbc" or "only accepts RSA or DSS"
This… I ran into this and it was a real pain, because it only applied to Visual Studio for some reason, I could SSH in just-fine from a console. It was effectively saying that there was no shared cipher between visual studio and the target linux machine that they could use for the connection.
It took a BUNCH of time to work out what was going on, but the fix is thankfully quite straight forward.
Effectively, the steam deck was supporting ALL of the ways that Visual Studio wants to connect and yet for some reason it wasn’t able to handshake.
You could confirm the overlaps of the keys by running the following commands:
ssh -Q cipherssh -Q macssh -Q kexssh -Q key
… It literally supported everything that VS was asking for, and more. In particular you’d see that the ssh-rsa and ssh-dss are in the list of keys supported too.
So what was likely happening is that even though it has this overlap on requirements, there seems to be a ‘priority order’ issue going on, where even though it supports what VS wants, it agrees at some higher-level (as with other SSH clients) on a different key algorithm, connects successfully with that (as both machines have it), and then Visual Studio’s connection manager checks it and goes “no, I don’t like this one, RSA only please!”.
The fix, to counter this priority order issue, is to actually restrict the number of host key algorithms available, to ones that Visual Studio is happy with.
1. ssh into the steam deck
2. sudo nano /etc/ssh/sshd_config
3. At the bottom of the file, add these lines (or modify them if they already exist) and save the file.
# From microsoft's documentation on setup.
Ciphers aes256-cbc,aes192-cbc,aes128-cbc,3des-cbc,aes256-ctr,aes192-ctr,aes128-ctr,aes128-gcm@openssh.com,aes256-gcm@openssh.com,chacha20-poly1305@openssh.com
HostKeyAlgorithms ssh-rsa
KexAlgorithms diffie-hellman-group-exchange-sha256,diffie-hellman-group-exchange-sha1,diffie-hellman-group14-sha1
MACs hmac-sha2-256,hmac-sha1
(You can see we’re limiting the HostKeyAlgorithms to ssh-rsa so that any higher-level handshaking returns an algorithm visual studio can work with)
(Note: Originally I restricted Ciphers to just “aes256-cbc,aes192-cbc,aes128-cbc,3des-cbc” as per Microsoft’s documentation, and that worked for VS, but it broke the command-line SSH which was a real pain as it meant that fixing the file back had to be done on the deck itself again with the virtual keyboard 😅; just mentioning that in-case you come across the same documentation and think to change it!)
4. Restart the ssh daemon on the deck (you can just do this via an ssh’d connection to the deck)
systemctl restart sshd- enter the password
5. Confirm everything is still working ssh-wise by exiting out of your current ssh’d console/terminal (if you’re in one), and then ssh into the deck from a fresh one. If there are problems and the above has reduced the list of Ciphers, then you may need to re-expand some of them, though I’ve had no issues with the above set.
6. Try again to add a connection in the Connection Manager in Visual Studio, and this time it SHOULD work! 😅🤞
If not, I’m afraid you might have to go digging as I can only write-up the cases I hit, but don’t lose heart, it’s solvable with enough elbow grease!! Put a comment on this post and I’ll add a reply with all the resources I found most-useful when tracking down the above issue and solving it!
Making a Visual Studio Linux Project (“VSLinux”):
Okay so you’ve got your connection sorted, that was the potentially-tricky part, depending on if you ran into any issues or not.
Setting up a visual studio project that you can use to distribute and build on a remote machine, as well as debugging on a remote machine, is thankfully very straight forward after that point 😊
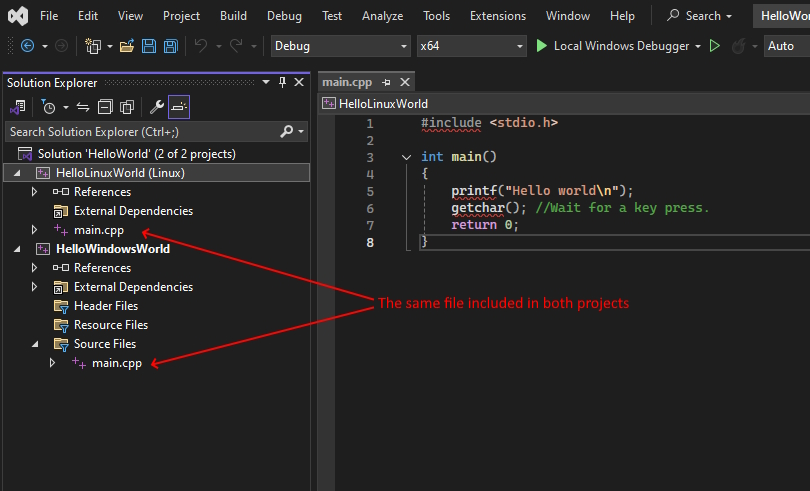
For a quick pre-amble here, as I tend to use this setup to test on both Windows and Linux from a single solution, my starting point here is a “Hello World” program with a Windows project already included that looks like this:
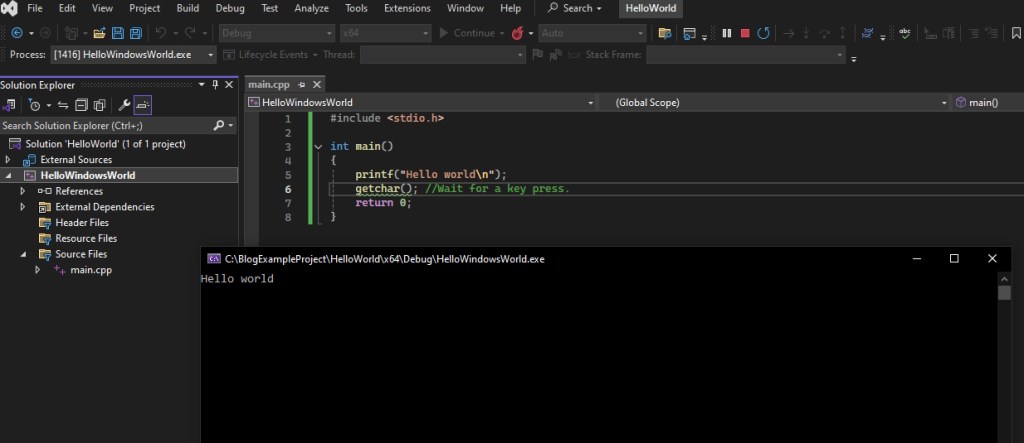
In this example, the ‘main.cpp’ file you can see is not alongside the project files, but is in a separate ‘Source’ folder alongside the solution, so we can share it between multiple projects later.
We’ll be ‘adding’ a VSLinux project to this solution, but it’s all the same dialogs that you would get when just creating a new project from scratch.
Right-click on the solution and do Add->NewProject

This will bring up the following dialog:
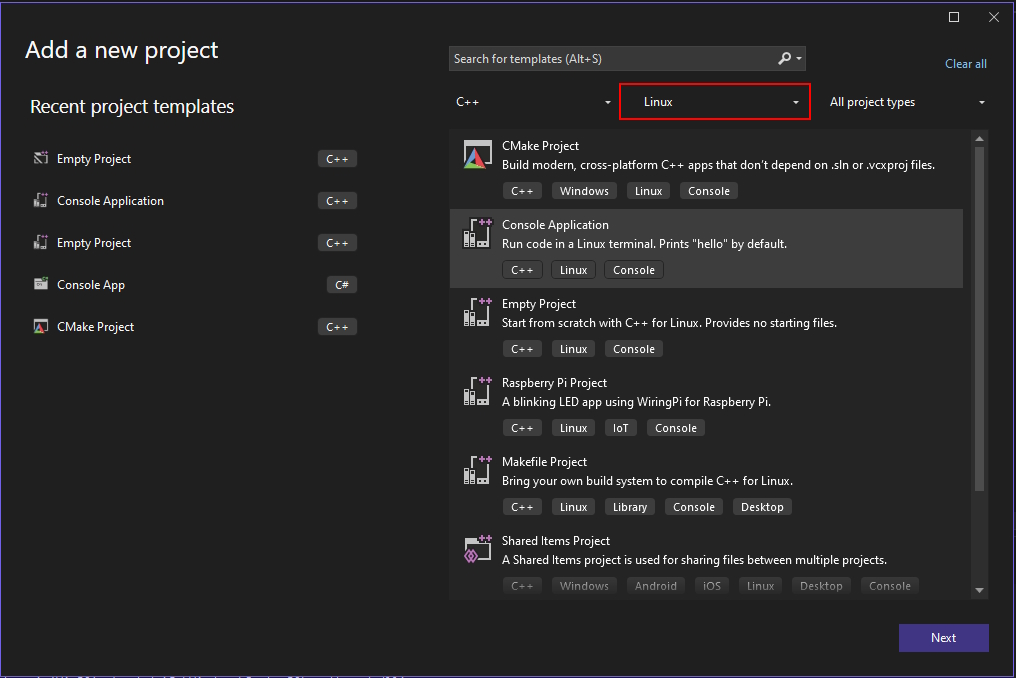
Be sure to select ‘Linux’ on the drop-down as-highlighted and select ‘Empty Project’ (the one under the highlighted one in the pic above, oops)
Then hit ‘Next’.

For our example here we just name it ‘Hello Linux World’ so that it’s clearly differentiated.
Hit ‘Create’.
Then once you’ve created your project, we’ll want to add our existing code file to it by right-clicking on the project and doing “Add->Existing Item”

This is what it will look like afterwards:
Now before we do anything crazy like build, let’s take a look at some of the new settings on the VSLinux project!
Access the Linux-project properties from the context menu:
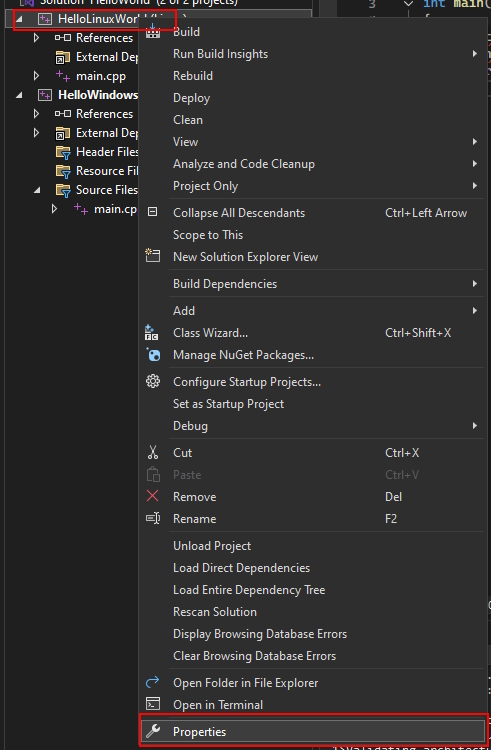
This will bring up a familiar, but not quite the same, “Property Pages” screen where there’ll be some notable new additions. Let’s discuss a few of them!

There are a few important things to call out here:
1. Note that the “Output Directory” and “Intermediate Directory” at the top are NOT where it goes remote-machine-side. When building through VSLinux like this the compiled files, intermediates, etc all get copied back to the Windows machine, and these paths specify where they’ll end up Windows-side.
2. The ‘Remote’ versions specify where things are going to go on the remote machine, so let’s take a look at some of those.
- Remote Build Machine:
This should be the connection you just set up above. - Remote Root Directory:
This is the root folder on the remote machine where all of your projects will end up (e.g. if you had multiple projects in a single solution). By default it is “~/projects” which is to say, the projects directory under the home directory of the current user. - Remote Project Relative Directory:
This is the directory that this project’s files will actually end up in. By default is is the name of the project, so for our example it means the files will be written to “~/projects/HelloLinuxWorld/”, as we will verify later. - Remote Intermediate Relative Directory:
This property, then, says where to put the intermediate object files and by default it’s in an ‘obj’ folder underneath the remote project relative directory it just set above. - Remote Output Relative Directory:
This just says where to put the compiled binaries, and by default is relative to the project directory’s remote path too, in a ‘bin’ folder. - Remote Deploy Directory:
When you right-click & deploy the project this is where it goes. By default it’s the same place you’d send the files with a combination of the above (remote root directory and remote project relative directory).
We don’t need to CHANGE any of these just yet, but it’s good to know what they are, so you can set them to your own preferences later.
Aside from the ‘General’ page, you’ll also want to check out the Debugging page:

One important thing to call out here is that the remote machine for debugging does not have to be the same as the one for compiling! That’s why they let you specify it in two places.
I tend to always keep them the same, but in theory you could build on one machine, then deploy and debug on another.
I mainly point it out here because if you have multiple targets and occasionally switch between them, you’ll want to swap both! (for each project).
Other things of note to call out here are:
- Pre-Launch Command:
This is important if you are making graphical applications, as you will need to put “export Display=:0.0” here or otherwise any calls to graphics initialisation (e.g. SDL_Init() or glutInit()) will just hang or even outright exit the program. - Program:
This specifies which program to launch when debugging. If it’s empty it will launch the program output for the project that’s your startup project.
However, if you wanted to debug a library/shared-object project, and that library is loaded by a program at runtime, then you’d specify the path to the program here so it knows what to launch (it can’t launch the .so file directly after all!) - Program Arguments:
These are your command-line arguments you’d send to your program. - Working Directory:
If you tend to keep your Binaries in a separate location you can set an explicit working directory.
As with the general settings, there may be more things you’re interested in, as well as all of the standard things you’d be interested in.
A few examples might include:
- Setting a preprocessor under “C/C++->PreProcessor”, such as TARGET_LINUX, so you know you’re compiling for linux and can pragma-define-branch linux-specific code within the shared codebase (and you’d want to add something on the windows projects for the windows-specific code etc).
- Under C/C++->General, you may want to specify warnings to ignore (e.g. I use ‘no-unused-function’ because I don’t mind there being generic functions that are used on some platforms but not ‘yet’ used on others).
- Under Linker->General you may want to specify additional library directories and under Linker->Input you may want to specify those actual additional library dependencies.
- … and so on.
- These things are all setable separately on the linux projects because they may be coming from different locations or warrant different behaviour Linux-side, plus you’re most-likely working with a different compiler toolchain (probably gcc or clang) Linux-side too, so it’s important to be able to tweak all of this.
Okay that’s enough settings… let’s BUILD our Linux project right on the Deck itself, by right-clicking and doing ‘Build’.

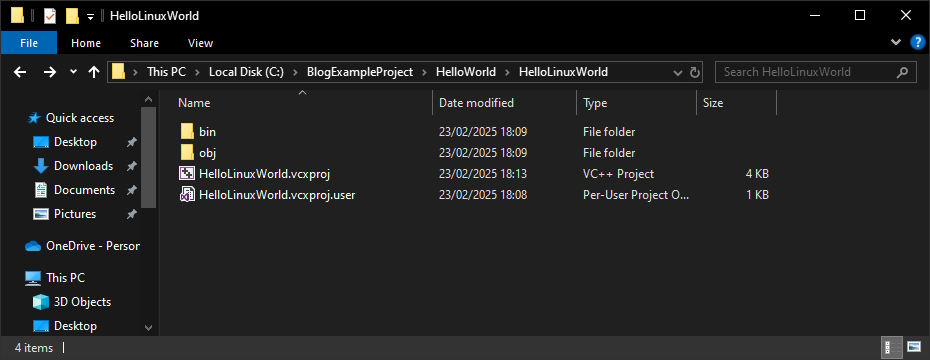
You should be able to see on the remote machine that the files have been deployed to where we expected, and the intermediate and output directories have been created in the expected locations too.
(Note that for ease of getting a screen-grab, I took the screenshot from my Ubuntu 24.04 linux machine, but it’s the same on deck)

With the above explanation on paths etc what you see here should make sense.
- The files have been deployed to ~/projects/HelloLinuxWorld/
- The Source folder with the shared source file was synced (1 item)
- The project’s folder was created too, but as we don’t have any files in it except the actual projects (which aren’t synced), its empty (0 items)… if you had source files alongside the project they’d be in there.
- The ‘bin’ and ‘obj’ folders are there as specified by Remote Intermediate Relative Directory and Remote Output Relative Directory.
And if you look Windows-side, you can see that the intermedite object files and the output binaries have been copied back into their relative folders alongside the project files.
The only thing left to do now is the RUN the project on the Deck with the debugger attached.
Firstly set the Linux project as your startup project by right clicking on it and selecting ‘Set as Startup Project’:
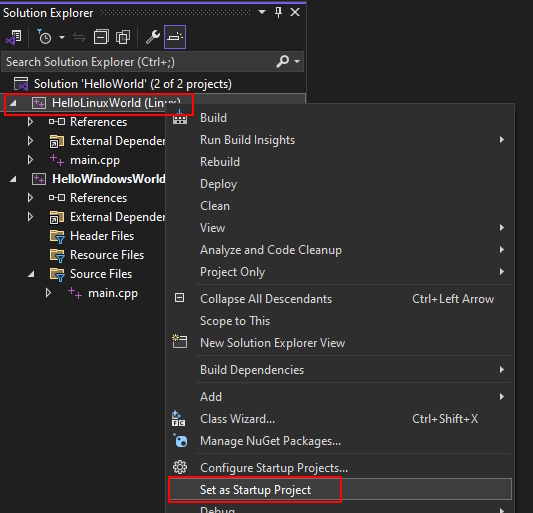
And then just run as-normal with e.g. F5.
The project will run remotely, attach the gdb debugger, and will also spawn a ‘Linux Console’ tab in Visual Studio which behaves the same as the terminal would on the remote machine (e.g. you can click in it and press a key to get past the getchar() call)

You can also just run the program Linux-side through normal means of course, e.g. open up a terminal and run it directly.

(Again, for ease of getting screenshots I took this on my Ubuntu VM, but it worked just the same on Deck).
So what now?!
Well, that’s really it. You can now have a single solution with Windows and Linux projects acessible from your windows machine, make one set of code that they both include (gate any platform-specific bits on a platform-preprocessor set for each project), and then just swap back and forth between compiling/running on Windows, and compiling/running on Linux. I really like this workflow personally (as I mentioned at the top), and use it to make sure that everything I’m building works across both platforms at all times.
Now, there is some friction here where e.g. every time you add a new file to the project you have to add it to both, and files are only deployed to the remote machine if they’re part of the project (that’s where it gets its list from), and yeah that can be a bit of a pain…
I get around this issue on my larger engine work by generating my project files with premake, and I have my own version of a vslinux extension for it that handles filling in all of the remote paths etc (which is way too much to go into in this post). But when you’re just getting started, it’s better to do it by hand so you gain an intuition for what each of the settings does and your preferred workflow for where things are put etc. You can swap over to a generated solution later on and then wrangle it into generating the same setup (if you’re happy to first learn Lua and modify the vslinux premake extension that’s out there… or newer versions of premake might even add it natively, who knows… or you might have a different project-generator that does what you need, but whatever approach you take, it’s important to understand the thing it’s generating first!)
A couple of important notes about trying to debug visual applications this way:
1. Remember to export your display!
I mentioned it above, but you will need to remember to add the following into the Pre-Launch command on the Linux project, or your visual applications won’t work when launched remotely:
export DISPLAY=:0.0
2. You will also need to configure xhost to allow it to host graphical applications remotely.
If you don’t do this then your graphical applications will fail to debug remotely.
This can be a bit confusing, so I cheat a little bit here and I just say “let it host for anyone”, because I’m running on local hardware and a local VM.
To do this I just have a startup command that runs on the Linux-vm and Deck that does this:
xhost +
(“access control disabled, clients can connect from any host”)
If you find yourself hosting in the cloud or something, and want to lock this down properly, then look into xhost further… but this workflow works for me for development purposes 😁
A bonus visual program!
I did promise in my last post that I’d cover a visual example here, so in true first-graphics-application style, we’re going to get a window with a spinning vertex-coloured triangle up and running ON the SteamDeck by modifying the program that we wrote above.
First of all, this is going to be using glut and OpenGL, so if you didn’t already, you’ll want to go and install the glut, GL, and glu bits from the bottom of the previous post!
Additionally, you’ll want to add the following library dependencies to your project so it can link:
glut;GL;GLU
With that said, here’s the code!
#include <cstdio>
#include <unistd.h>
#include <GL/glut.h>
#include <GL/gl.h>

void GL_HandleResize(int w, int h)
{
	glViewport(0, 0, w, h);
	glMatrixMode(GL_PROJECTION);
	glLoadIdentity();
	gluPerspective(45.0, (double)w / (double)h, 1.0, 200.0);
}

void GL_DrawScene()
{
	int iTimeSinceStart_ms = glutGet(GLUT_ELAPSED_TIME);
	float fTimeSinceStart_sec = (float)iTimeSinceStart_ms / 1000.0f;
	float fAngle = fTimeSinceStart_sec * 120.0f;

	glClear(GL_COLOR_BUFFER_BIT | GL_DEPTH_BUFFER_BIT);
	glMatrixMode(GL_MODELVIEW);
	glLoadIdentity();
	glPushMatrix();
	glTranslatef(0.0f, 0.0f, -5.0f);
	glRotatef(fAngle, 0.0f, 1.0f, 0.0f);
	glBegin(GL_TRIANGLES);
		glColor3f(1.0f, 0.0f, 0.0f);
		glVertex2f(1.5f, -0.5f);
		glColor3f(0.0f, 1.0f, 0.0f);
		glVertex2f(0.0f, 1.5f);
		glColor3f(0.0f, 0.0f, 1.0f);
		glVertex2f(-1.5f, -0.5f);
	glEnd();
	glPopMatrix();
	glutSwapBuffers();

	//And another frame plx.
	glutPostRedisplay();
}

int main(int argc, char **argv)
{
	glutInit(&argc, argv);
	glutInitDisplayMode(GLUT_RGBA | GLUT_DOUBLE | GLUT_DEPTH);
	glutInitWindowSize(800, 600);
	glutInitWindowPosition(240, 60);
	glutCreateWindow("Hey, you can debug graphical applications remotely now! And on Steam Deck! Congrats! - Gav");
	glEnable(GL_DEPTH_TEST);
	glClearColor(0.0f, 0.0f, 1.0f, 1.0f);
	glClear(GL_COLOR_BUFFER_BIT | GL_DEPTH_BUFFER_BIT);
	glutSwapBuffers();

	glutDisplayFunc(GL_DrawScene);
	glutReshapeFunc(GL_HandleResize);
	glutMainLoop();
	return 0;
}
If you’ve installed the required dependencies on the deck, added the necessary libraries to the project, remembered to export DISPLAY=:0.0, and have run “xhost +” on the deck, then you should now be able to run and remotely debug your very own glut & OpenGL spinning triangle application. Congratulations!

(By default it runs in an 800×600 window, I just maximised the window for the picture because no-one needs to see my mess of scripts etc on the desktop, from other work I’ve done 🤣😱)
Wrapping Up:
So in our three-part series now, we’ve connected to Steam-deck via SSH, set up SSH keys to make that cleaner, installed a full development environment and tested it with command-line GCC, and now we’ve gone through how to compile ON that remote SteamDeck (or any Linux box) from your local Windows PC, through Visual Studio, providing a single IDE-solution and workflow for maintaining both your Windows and Linux platform support, and we even covered a graphical example just to make sure you’re all set up properly! 😉
At this point you can really go forth and start porting your Windows applications (which may have VS projects), to native Linux versions and can get them up and running on the SteamDeck!
Have fun with it, and leave a comment if you have any questions about anything further 😁😁😁
And as always, until next time, happy coding!

Leave a reply to gavcostello Cancel reply